Showing posts with label fabric strips. Show all posts

Thursday, December 10, 2020

Sewing goodies other than masks again (thought not done with masks!)

I guess it's a good sign that mask sales are down! (Can't wait for the vaccine to be injected into my arm!). I did, however, donate 35 masks to a group of educators yesterday. I've been donating masks all along and this donation made me feel particularly proud. The teachers are still teaching in the classroom, even during the pandemic. We need to be safe and keep others safe. Are you sewing masks? 

Here's what I'm sewing these days:


My daughter has been asking for a stocking for her dog, who will be celebrating her first Christmas together this year. I drafted a pattern and made a prototype for her. It's a large bone shape on the back and 3/4 of a bone shape on the front. I have to revising to do to the pattern, but not bad for a first effort. I had all the fabrics on hand (the paw fabrics are from my mask making stash) and added the pre-quilted back and red/white stripe ribbon to add some Christmas flare. I like it and can't wait to try more.

I've been working on these particular placemats for a long, long time. I began making them some time ago and ran out of the corn fabric used for strips on the front. When I had some breathing room, I started searching for more of it. I finally found it at Colorado Creations Quilting. They were pretty marvelous to work with and are going to show these off in their newsletter. I sew 2" strips of denim end to end and wrap it into a roll, then it gets used in this kind of project. I love the way the denim colors flow together and add some contrast and upcycling at the same time. 

You can make strip quilted placemats with denim, corn fabric, or whatever you want using this tutorial I wrote way back when - PLACEMAT TUTORIAL

My newest thing is another baby quilt. I decided on a Grandmother's Flower Garden pattern because I wanted it to be hand sewn. I always have a hand sewing project going. It's not easy for me to watch TV without one! I found the rainbow color bandanna fabrics, had the center fabric, and the path that will be going around the flowers is a black bandanna fabric. I want the rainbow colors to stand out and I believe they will.

What are you sewing? I'll keep sewing masks until they're no longer needed. I've just about worn out my 8-1/2" ruler and rotary cutter, not to mention the cutting mat. I'll be glad to retire them all. Let's hope the vaccine does its thing. 

Merry Christmas to you all and as always, keep stitching!


Wednesday, January 10, 2018

Open weave vest tutorial, Part 2 - Complete

 Here we go. Part 1 can be found here. But now it's time to cut and mark your pattern and start sewing.
I used Pellon's washaway stabilizer. You can use whatever brand you like as long as it will wash away when you're done. Be careful not to get it wet as you use it as it will disappear right before your very eyes. 

For the tutorial, I am using a child's vest pattern, but the concept is the same no matter what size you use. Even if the vest says it's lined, you will not line it; you won't need to. If it is a lined pattern, take a little extra off the front center seam allowance as you will not be using it. 

Place the front of your vest pattern on 2 layers of the stabilizer and cut it out. 

Mark the right side of each piece (the marking will wash away and will not show). Make a line with a ruler on the front of the vest (right side). I chose a diagonal pattern. You can use horizontal and vertical, though. That choice is yours.

Decide how far apart you want your woven strips. For the child's size vest, I used a 1" wide ruler and followed the first line I drew, marking lines 1" apart. 
Mark the stabilizer from top to bottom with your pencil and ruler. 

Make a line in the other direction (again, I chose diagonal). 

And make your 1" line markings all the way from top to bottom.

Repeat this process with the other front pattern piece, trying to match the diagonal lines where they meet in the center. 

Now, let's weave!

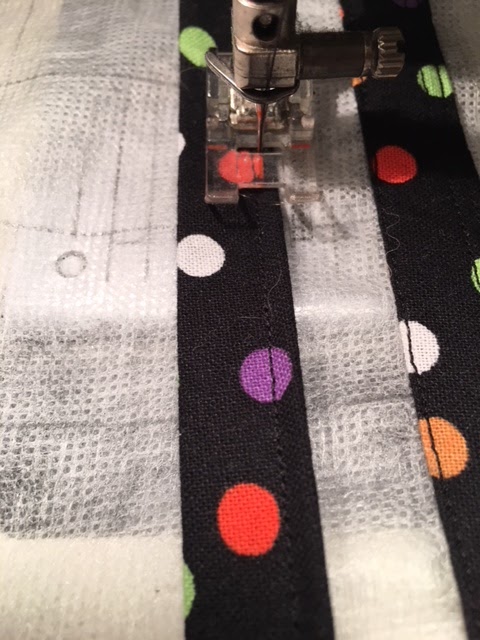
Using the roll of strips that you made earlier, put the strip on or beside one of the lines you drew. Whether you choose to put it on the line or beside it, do it the same for every one. I chose beside the line for this one. Stitch from edge to edge onto the stabilizer. Turn and stitch back to the first edge. Pretend the stabilizer is not going to wash away and make sure your strip of fabric is firmly attached. 

Place a second strip on or beside your next drawn line and repeat the process. 

Stitch close to the edge of your strip. This particular fabric didn't show the stitching lines much, so I had the freedom of being a little less than perfect. 

Continue until you have all strips going in one direction stitched to the stabilizer. 

This is not a true weave per se, but it will look like it when done since the strips are of the same fabric. If they were different fabrics, I would have done over and under weaving. In this case, place a strip on or beside a line that is going the other way and stitch your fabric from end to end, turn and stitch again. This time, the two directions of stitching are more important because you're anchoring the strips to one another and not just the stabilizer.

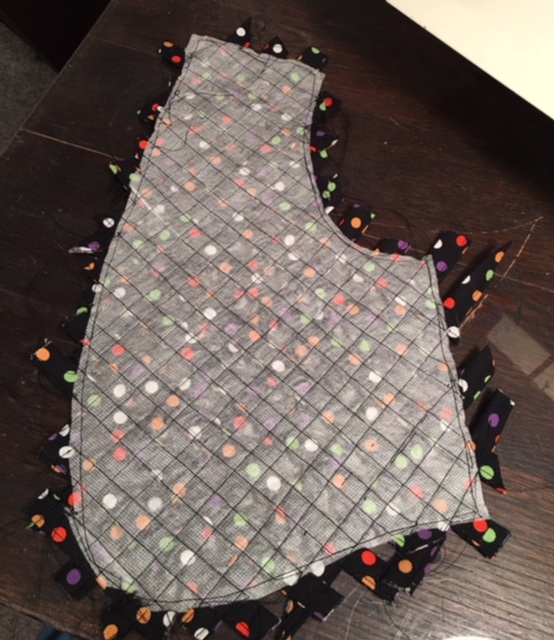
When all of the strips are sewn (you can see my sewing lines here), turn the pattern over and stitch a scant 1/8" from the edge of the pattern all the way around using the stabilizer as your guide. 

Here's the right side view. 

And here's the wrong side view which also shows the edge stitching that holds the strips stable until the binding is done.

Trim excess fabric edges and set aside. Repeat with the other front pattern piece. 

Looking like a vest front now, isn't it? 
Using your favorite method, make bias binding out of the same fabric you are using for the vest back.

Cut out the vest back. Even if the pattern is lined, you will not line it, so you need to cut a little extra at the armhole and neck seam allowances.

Construct your vest by sewing the sides right side together and the shoulders right side together. Finish the seams however you like. I find that using your serger is a best practice, but you can also use pinking shears and press the seam open or press the seam to one side and stitch it down. 

Apply bias binding by machine to the armholes by encasing the seam allowance in the bias tape you made. I generally start at the side seam and go around the armhole, careful not to stretch the binding too much. The rest of the bias binding will go around the remainder of the vest. I usually start at the neckline and take it all the way around, finishing at the neckline. You can machine stitch both sides or machine stitch one side and hand stitch the other (my preferred method for hiding of stitches).

When you are done, wash the vest. Trust me. You'll want to do this part to get rid of the stabilizer. Another way to do it is to spritz the wrong side of the front of the vest with water. 

And you're done!


The addition of washaway stabilizer to my sewing room has opened up new design possibilities. You can use a real weave with over and under on strips or simply place them one upon the other like this vest. Once you encase the strips in bias binding, they're as stable as they can be and your vest is machine washable and able to be put in the dryer (if the fabric allows).

Have fun and be sure to share pictures if you make one for yourself or a child. Or even for your dog. Just sew. That's the big thing.

Let me know if you have questions!

Sunday, October 1, 2017

Anna and Brian quilt, now known as Catherine's quilt!

The quilt is done (May 28 - October 1, 2017). The baby's been born. Now to bring the two together. It's taken time as I've been working on a play and doing some other things, but here's the result and I hope they love it.

This is a 4x5 block log cabin design. The first fabric I chose was the train fabric, a nod to Catherine's father, Brian. I found muted ROYGBV fabrics at Joanns and created the log cabin around a 2" piece of the train fabric. 

I had plenty of the log cabins left when I was done, so decided to create a small pillow to go with the quilt. I fashioned a ruffle out of strips of fabric and there you go!
The back of the quilt, which was made quilt-as-you-go, is train fabric.  
Here's a closeup of the ROYGBV log cabin. I used 2 strips of each color, but all the prints are different. 
I created binding using the strips I had cut for the log cabin itself. I reinforced all the seams in the binding since the pieces are so small and I want it to hold up to as many washings as needed. Everything except the binding was machine stitched. I like to hand stitch the binding on a quilt. 
And the pillow. I added strips to an original log cabin until I had used each of the color designs twice. That made a nice size (about 12") pillow. But it needed a ruffle! I had plenty of strips left from the quilt itself to make a ruffle. For the log cabin side, I used train fabric.....
....and for the train fabric side, I used the ROYGBV strips. I think it looks pretty cute! 

I'll be seeing Anna soon and will deliver the quilt, pillow, and some other goodies in person. I'm excited to pass this along and hope Catherine drags it around the house, gets it dirty, loves it, and who knows what else with it. It's hers now. Welcome to the world Catherine Jenkins!

Friday, July 11, 2014

So, I had pneumonia - guess what I did? Sewing, sort of. (Update: 09/14/14)

 I don't crochet, I really don't. But, I used to, sort of.  

I crocheted a very small rug about 25 years ago. It lived in the bathroom for years. I had a book about crocheting fabric and remembered that I used to crochet as a kid. I wondered how hard it could be, and it wasn't. I did the easy oval that was shown in the book and used up tons of remnants of fabric. The yarn is 1-1/2" strips that are torn, attached to each other with just a few stitches, and then rolled into a ball. The hook is either J or K. Whatever it is, it's huge. 

Well, I ended up with pneumonia somehow and had to stop exercise classes and take it easy. I made a blouse (will share that after I have a photo). I repaired all the mending that needed help. I was so bored. I wasn't in the mood for fine hand sewing to work on my hexie quilt. I broke out that big hook, started tearing remnants into strips and began my oval. I made the first piece THREE times. I took it apart because it was so humpy in the middle. (I can't find my book, so was going on memory and a few online instructions.)  After taking it apart the third time, I got it to the size shown here. And I was running out of remnants. 


I found a bigger piece of fabric that I had intended to make into the bodice of an Empire waist dress. As it turns out, I made two dresses out of that pattern and neither were all that great. They became "toss on in the morning until you get dressed" dresses. A third was no longer in the works, so I tore that into strips too. Why not? And I crocheted and crocheted and crocheted, and the result for round 2 is below. 


Interestingly, the light blue above is the print that would have been the rest of the Empire waist dress I never made. Between that and the rust color is some old brightly colored snake fabric. I knew I'd never use it for anything, so into the rug it went. 

I then moved on to a darker blue, which I ran out of fairly quickly. I grabbed some light weight lavender fabric and tore it into strips and got started on growing the rug even larger. I got around one time with the lavender and said to myself - You are not sick anymore. You do not need this rug anymore.  

And I was right. 

I tied it off and put it in the dog's crate. I'm making a cushion for her crate, but it's not big enough for the whole thing, so the newly dubbed Pneumonia Rug fills in just right. 


It's not pretty, it's lumpy and bumpy, but you know what? I love it. It has kept me company and kept me semi sane for a few weeks now. My obsession with crocheting kept me from being obsessed with my illness. 

Today, I went to exercise for the second time since being ill, I am back to feeling like cooking, and I am sleeping again - all of those things were disrupted or interrupted for several weeks. I'm so happy I'm back! 

Another upside to being sick, but not sick enough to not sew, is finishing those little unfinished projects I had lying around. 

Thanks to everyone who wished me well and let's get back to our needles and thread! 

Update: My dog loves the rug and the covered dog pillow which now live in her crate. We keep the door open and she stops in once in a while just to hang out. And sometimes, dad gets in with her.