Showing posts with label vest. Show all posts

Friday, February 7, 2020

New Open Weave Vest

I've written about open weave vests before, including a tutorial:  Part 1 and Part 2. I've made them for me using strips of fabric that I've manipulated into warp and weft, and I've made them for dolls using ribbons of all ilk. And I'm making one again today. No photos yet, but will share when it's done.

Traditional basket weaving, which is how I'm working the current vest, is precise and exacting. (The tutorial linked above uses strips laid over one another rather than over/under weaving.) Today, I marked the wash-away stabilizer and started on the front of the vest, the woven part. For about an hour, I enjoyed a cup of coffee and took my time going over and under the strips as a weave began to appear. It grew over the next few hours and then, regardless of my pre-planning, I started to run out of strip fabric. It takes miles of the strip to make these things!

I stopped and started cutting new strips to attach to one another, fold in half, and prep to fold in half again. I'm done for today. I don't want to get sick of the project before I even finish the front! I'm about 2/3 done with one side of the front and am liking the way it looks.

This is one of four vests I'm making, and I have fabric for a couple of colorful tunics. I've been adding more color to my wardrobe and separates are a great way to do that. I also have put more sewing into my days as I'm now retired. It's win-win.

More to come as I tackle the piles of sewing projects I have waiting for me to get busy!

Monday, January 6, 2020

Pillows and fabric and what else?

I put out a call on Facebook asking for fabric if people have any to donate to the community service sewing I'm doing. An interesting number of people came forward and said they have some to donate! I don't mind using my own fabric or buying fabric, but it sure is nice to use some that's free.

Here's today's pillow.

I may have mentioned I'm playing with designs. Years ago, I made quilt squares and framed them to give as gifts. This project, to me, is the same thing. I'm playing with angles, color blends, and overall keeping the artsy fartsy side of me engaged. That can only be a good thing. I get lost in design and if I see something I want to try, I do it! I'm not committed to a whole quilt. It's one pillow top, or more if I desire.

On another burner, I've been making vests for myself and using wacky, colorful fabrics. I love dressing in clothes that make me feel alive.

Maybe this retirement thing isn't so bad, right? 

Wednesday, January 10, 2018

Open weave vest tutorial, Part 2 - Complete

 Here we go. Part 1 can be found here. But now it's time to cut and mark your pattern and start sewing.
I used Pellon's washaway stabilizer. You can use whatever brand you like as long as it will wash away when you're done. Be careful not to get it wet as you use it as it will disappear right before your very eyes. 

For the tutorial, I am using a child's vest pattern, but the concept is the same no matter what size you use. Even if the vest says it's lined, you will not line it; you won't need to. If it is a lined pattern, take a little extra off the front center seam allowance as you will not be using it. 

Place the front of your vest pattern on 2 layers of the stabilizer and cut it out. 

Mark the right side of each piece (the marking will wash away and will not show). Make a line with a ruler on the front of the vest (right side). I chose a diagonal pattern. You can use horizontal and vertical, though. That choice is yours.

Decide how far apart you want your woven strips. For the child's size vest, I used a 1" wide ruler and followed the first line I drew, marking lines 1" apart. 
Mark the stabilizer from top to bottom with your pencil and ruler. 

Make a line in the other direction (again, I chose diagonal). 

And make your 1" line markings all the way from top to bottom.

Repeat this process with the other front pattern piece, trying to match the diagonal lines where they meet in the center. 

Now, let's weave!

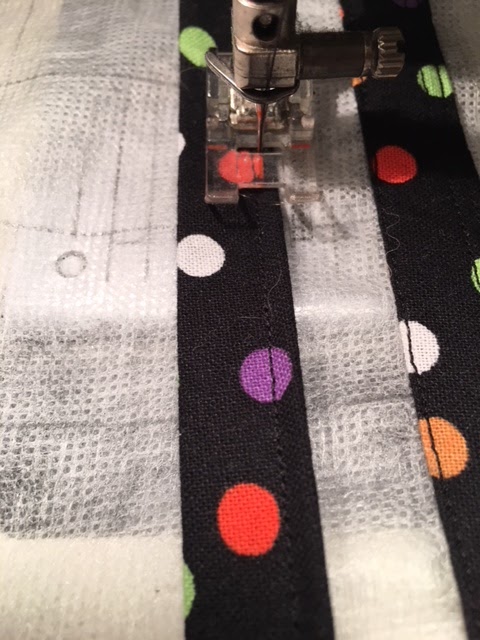
Using the roll of strips that you made earlier, put the strip on or beside one of the lines you drew. Whether you choose to put it on the line or beside it, do it the same for every one. I chose beside the line for this one. Stitch from edge to edge onto the stabilizer. Turn and stitch back to the first edge. Pretend the stabilizer is not going to wash away and make sure your strip of fabric is firmly attached. 

Place a second strip on or beside your next drawn line and repeat the process. 

Stitch close to the edge of your strip. This particular fabric didn't show the stitching lines much, so I had the freedom of being a little less than perfect. 

Continue until you have all strips going in one direction stitched to the stabilizer. 

This is not a true weave per se, but it will look like it when done since the strips are of the same fabric. If they were different fabrics, I would have done over and under weaving. In this case, place a strip on or beside a line that is going the other way and stitch your fabric from end to end, turn and stitch again. This time, the two directions of stitching are more important because you're anchoring the strips to one another and not just the stabilizer.

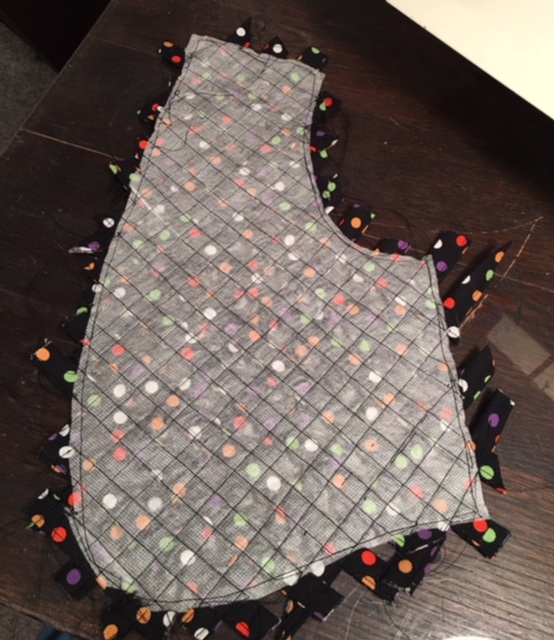
When all of the strips are sewn (you can see my sewing lines here), turn the pattern over and stitch a scant 1/8" from the edge of the pattern all the way around using the stabilizer as your guide. 

Here's the right side view. 

And here's the wrong side view which also shows the edge stitching that holds the strips stable until the binding is done.

Trim excess fabric edges and set aside. Repeat with the other front pattern piece. 

Looking like a vest front now, isn't it? 
Using your favorite method, make bias binding out of the same fabric you are using for the vest back.

Cut out the vest back. Even if the pattern is lined, you will not line it, so you need to cut a little extra at the armhole and neck seam allowances.

Construct your vest by sewing the sides right side together and the shoulders right side together. Finish the seams however you like. I find that using your serger is a best practice, but you can also use pinking shears and press the seam open or press the seam to one side and stitch it down. 

Apply bias binding by machine to the armholes by encasing the seam allowance in the bias tape you made. I generally start at the side seam and go around the armhole, careful not to stretch the binding too much. The rest of the bias binding will go around the remainder of the vest. I usually start at the neckline and take it all the way around, finishing at the neckline. You can machine stitch both sides or machine stitch one side and hand stitch the other (my preferred method for hiding of stitches).

When you are done, wash the vest. Trust me. You'll want to do this part to get rid of the stabilizer. Another way to do it is to spritz the wrong side of the front of the vest with water. 

And you're done!


The addition of washaway stabilizer to my sewing room has opened up new design possibilities. You can use a real weave with over and under on strips or simply place them one upon the other like this vest. Once you encase the strips in bias binding, they're as stable as they can be and your vest is machine washable and able to be put in the dryer (if the fabric allows).

Have fun and be sure to share pictures if you make one for yourself or a child. Or even for your dog. Just sew. That's the big thing.

Let me know if you have questions!

Tuesday, January 9, 2018

Sewing in the new year

I promise I'll finish the open weave vest tutorial. In the meantime, I've made two of the size 4 vests and one for me, a bit bigger than size 4. I've also made two patchwork Minions vests in size 4. Photos of those to come. For hand sewing, I'm working on a calico and white muslin Cathedral window doll quilt. Lastly, I'm still working on folded fabric ornaments for next year's Christmas (those will be on sale). I've stocked up on Hanukkah fabric to make some placemats, but that's on my to-do list.

My new thing is painting rocks for the Kindness Rocks Project. My painting skills are not the greatest, but that's not the point. Here are a few I've painted and set free to be found:
My daughter placed this one in Boston for me. 


The above were all released in Williamsburg, VA, where I live.

This one went out today on National Law Enforcement Day. 

I have officially semi-retired and have more time to sew than ever before. It's very odd having real free time. Raising three children and working full time forever have kept me more than busy. Relax? What's that? I don't know how!

I have the photos for the open weave vest ready to go. I need to sit down and just do it. It's a fun and tedious project, and the results are so worth it.

Keep sewing!

Sunday, December 10, 2017

Open weave vest tutorial Part 1

I made this vest in the late 90s. I didn't really know what I was doing and there was no such thing as wash-away stabilizer, so there was a lot of paper picking to be done when it was finished. I still love it and wear it often, but was feeling like it was time to make another one. 

Find a print you like and make a whole lot of strips. 

I cut my strips (not on the bias!) in 2" widths, sewed them together, pressed the seams open, and then pressed the whole thing while folding it in half. I'd love to tell you exactly how long your roll of sewn strips needs to be, but I can't. I eyeballed it. The good news is if you don't have enough, you can make more. 

Ignore that shoe in the corner. You can see the fold here. 

Now, open the folded strip and fold the edges toward the center. You don't need to press at this point, but you can if you like.

Fold the two new edges to meet each other and stitch down the edge, finger folding as you go.

This is a little better view of the stitching the folded edges together. 

When you're done, roll up your now very long strip of stitched fabric and set it aside. 

You will need a vest pattern with no darts and no closure. You may be able to use frog closures or something unique, but there will be no way to put buttonholes in the front of the vest. I like this one: 
I did round off the edges at the bottom; it will make bias application later much easier. 

You will also need fabric for the back of your vest that complements the strips as well as a yardish of wash-away stabilizer. You will use this for making the front of the vest. You will be using a lot of thread making the front. A child's vest uses at least one bobbin's worth! 

Part 2 coming soon!


Friday, May 20, 2016

Busy!

It's been a busy time in the sewing room. It seems like there's always something to mend or to create or fabric that just needs to be looked at one more time.

My sister recently moved in with us and the sewing room is filled to the brim with boxes. Two days ago, I mentioned to my husband that I needed to create a path to the sewing machine and ironing board, that I was having withdrawal! We spent a productive 15 minutes moving things around, and voila! I was in business again.

I finished some brain and blood spatter potholders:

and started to work on a denim project I have going.

I took a quick inventory of my UFOs hanging around - a quilt for a friend's mother, a vest I've been designing; and some items recently finished - a doll outfit and vest made of M&Ms fabric, and realized I need to step it up!

There is always sewing that needs to be done. Or is there sewing that I want to do? Is there a difference?

The bottom line is that I'm glad I have access to my machine and have 1,000 ideas of what I want to put together.

Here's hoping your spring is filled with sewing ideas!