Showing posts with label pillows. Show all posts

Sunday, January 12, 2020

Pillows for Hospice House, round how many now?

Simple patchwork with cheery and cherry fabrics. 
I have a lot of leftover hexagons that didn't get used for a Grandmother's Flower Garden quilt, and so, why not? 

I cut hearts and a square from the cherry pillow blocks. 
Another hexagon piece. 
Donated ties in a strip formation. 
A little of this and that.
And a couple of brown and whites, one in a log cabin design and the other just a mish mash of patchwork. 

More pillows to show off. I'll deliver these tomorrow and then I'm taking a brief break and working on some things for myself. 

Monday, January 6, 2020

Pillows and fabric and what else?

I put out a call on Facebook asking for fabric if people have any to donate to the community service sewing I'm doing. An interesting number of people came forward and said they have some to donate! I don't mind using my own fabric or buying fabric, but it sure is nice to use some that's free.

Here's today's pillow.

I may have mentioned I'm playing with designs. Years ago, I made quilt squares and framed them to give as gifts. This project, to me, is the same thing. I'm playing with angles, color blends, and overall keeping the artsy fartsy side of me engaged. That can only be a good thing. I get lost in design and if I see something I want to try, I do it! I'm not committed to a whole quilt. It's one pillow top, or more if I desire.

On another burner, I've been making vests for myself and using wacky, colorful fabrics. I love dressing in clothes that make me feel alive.

Maybe this retirement thing isn't so bad, right? 

Saturday, January 4, 2020

More pillows for Hospice House

Community service sewing sure makes a girl feel good. Here are my newest pillow creations for Hospice House. I'll post more of these as the year goes on. I'm having fun coming up with the patchwork designs. All of them are 13" x 13" and the backs of this bunch were provided by my sister (a sheet!). Enjoy:
Donated fabrics. 

Working on my black and white fabric stash.

Neckties. 

Simple 9 patch with black and whites. 

Donated fabrics in a split rail pattern.

Monday, November 4, 2019

A volunteer who happens to sew

That's me, I guess!

I started taking care of bird feeders (feeding, cleaning, bird baths, etc.) at Hospice House and Support Care in Williamsburg, VA recently.  The word got out that I sew. And another volunteer noticed my handmade tote bag. She asked me if I could make tote bags "like that." I surprised her by saying I made that one :)

As it turns out, Hospice House provides tote bags for families and the person who was making them wasn't able to continue. So, I stepped in and now I make lots of tote bags. They're very simple and I don't even line them as I don't know if they'll be kept or thrown away, and I don't care; the bag is no longer mine once I deliver it to the House. I've used up an awful lot of my stash and am collecting certain fabrics that would work well for the purpose.

Today, I met the person who sews pillows for guests at the House. They're decorative and offered to the family to take home. She brought in two great big bags of pillows she had made. As is wont to happen, we talked about sewing and it became clear that she did not want to continue to be the only one making them and maybe wanted to give it up. We talked for quite a while and I offered to take some of the pressure off by helping out. I'm not sure how this will turn out, but I wouldn't bother me one iota to help out. Pillows are fun to make and they're meaningful to the families.

I'm doing a couple other small projects for the House and probably will continue to do so for a long time. I volunteered for an early intervention center when I was younger and my children were babies and toddlers. I even worked for them for a while. Now, I'm volunteering at the other end of life's spectrum. A natural progression, I'd say.

Yes, I am a volunteer who happens to sew.

In the meantime, my nephew and nieces have asked for new trick or treat bags. They're the project for now! 

Sunday, December 18, 2016

Christmas Projects

I've been a little obsessed with fabric folding lately. I've been here before - Styrofoam, pins, fabric squares, and Elmer's to put on the tip of the pins when I place the fabric on the form. I started with two egg shapes this year. I covered them with two Christmas fabrics, cut off the bottoms so they sit flat, and added cording to the bottom to tie together all the colors. 
 
Then came the wreath. Oh my, the wreath. I had a lot of 1-1/2" strips of Christmas fabric a friend had given me, so I cut them into 1-1/2" squares and decided to do fabric folding on a wreath form. This took a lot longer than I thought it would, but I finished it and it is indeed on my door! (I want to redo the ribbon at a later date, though.) There are approximately 1600 applique pins and 800 squares of fabric, along with the red ribbon and a small wreath that my sister had, which I hung in the center to give the wreath a more completed look. 
I will fold more fabric, I'm sure, but my second obsession has been making ham bag pillows. I've made 6. Now what do I do with them? Here are two:
The second on is actually a vintage sugar bag, but it's the same concept.  

I'm sure there will be more sewing and fabric obsessions in the year ahead. I'll be decking out a new sewing area and that means organizing fabrics again, and again! Which ones will spark my creativity? 

Oh yeah, I did make a pair of slacks in between projects. 

There's always more to sew.

Merry Christmas everyone! Here's hoping Santa brings you lots of fun sewing stuff!

Last year's Christmas pillow made from a Christmas skirt I had made for an ugly sweater party the year before. See what I mean? One thing leads to another! 


Friday, March 20, 2015

Something old, something new, something borrowed, something blue

My daughter's friend is getting married. My daughter being the poor, starving graduate student that she is asked if we could collaborate. She sent me a wonderful picture of her friend after a run with her fiance. We'll call that something borrowed. I decided to print it and pair it with some beautiful sky fabric I have. Something blue! I had the pillow front planned.

I asked my daughter how her friend's home was decorated. She said, "Well, it's colorful!" That made me remember my small collection of cutter quilts. Something very, very old. I wanted to accent the colors and brighten them up, so I grabbed some white bias tape I had on hand. If had not had the bias tape I would have made strips the way I do with pie potholders. The bias part is not important for my pillow. When I applied the white on the colorful patchwork, I also added a piece of fabric as a lining since the quilt itself is pretty old. This will give it some longevity as the patchwork piece will not be pushed and pulled in all directions; the lining will. There are directions all over the internet for prairie points. Everyone makes them their own way. I fold a 2" square, then fold it again on the diagonal and call it a point.

So, what's the something new? The pillow.

Here it is with the points pinned on and the back with the patchwork pieces framed. I made the back a little larger than the front to give me some design flexibility. 


You can kind of see the decorative stitching around the picture itself. The points turned out beautifully. I might make them out of 3" squares next time. 


And here's the back. I love these old cutter quilt tops. I hate to think of them getting dusty and being unused in someone's attic. We can bring some life to them if we give them a second chance. My hints include reinforcing the seams as many are hand sewn and not very sturdy and to line any piece you use to keep it alive a little longer. As mentioned, with this pillow, I used a lining and then did the bias tape stitching. It just about pops when you see it in person; the colors which once seemed a tad dull on their own are bright as can be with the white framing. 

 And so, the pillow is made. I think I love it!

Tuesday, November 11, 2014

Recycling an ugly skirt part 1 (is it really this close to Christmas?)

First, let me remind you that there is a strip quilted Christmas stocking tutorial on ScrapStitching. You can find it here: Christmas stocking how-to. I hand drew the pattern, but you can trace the edges of one you already have. The question always comes up about whether it should be hung with the toe to the right or left. I don't know the official answer! If you do, holler.

Last year, I went to an ugly Christmas sweater party. I won! I had a sweater vest that looked like someone had thrown up a bunch of undigested Christmas.

What you can't see are the green tights and red shoes. Hah! I don't mess around. The skirt was made with strips of candy cane fabric, hemmed with snowflakes, and had some green/white/red piping at the bottom edge. (That's Susan sitting behind me; she had an ugly sweater on too.)

I knew I wasn't going to wear the skirt again, so came up with recycling idea number 1. I have part 2 planned, but you can't see that yet.

Fast forward to now. A friend purchased her first house and there's a housewarming on Sunday. I will so be there. I really didn't know what would be a good gift. Should I make something that matches her house? Then I remembered my skirt. How about a Christmas pillow? She wouldn't feel obligated to display it all year long and it would be unexpected and fun. So that's what I went with.

I used the stripes as is for one side:
Believe it or not, I used a hat box as a template for the circle. I like to look around and see what I have when I'm looking for circles, rectangles, and squares.

For the other side, I cut 2" strips of the striped fabric and placed it on a circle of muslin using a log cabin design (you can hardly tell it's a log cabin!):
It came out nice and random looking and that's sort of what I was aiming for.

Next came a trip to my Christmas trims box. I kept the red theme and grabbed some red lacy ruffle and added that to the edge.

I think it's kind of cute! And guess what? I don't have that ugly skirt anymore :)

Sunday, January 12, 2014

And a pillow for my daughter's friend! & a mini how-to

My daughter met her bestie at Busch Gardens many years ago. They both worked at Land of the Dragons as teens and have been inseparable since. When her friend saw the pillows I made for my daughter, she was verklempt! She had to have one. Her boyfriend also worked at Busch Gardens as the engineer for their train. So, I got the fabric I had leftover, found a coloring page of a military train (he works on a military base now), made a train with fabric and Wonder Under, and voila, a pillow for the friend and her feller. 

Here's the front and back:


This is the front in progress. It is a simple log cabin block variety. I always do log cabin freestyle without really measuring anything other than the center block. For this pillow, I knew I would run out of the Land of the Dragons fabric, so decided to do it more like a Courthouse Steps design. Here are some really simple instructions for log cabin blocks. You can do them simply or complicate the heck out of them with paper piecing and foundation piecing and fussy cutting. I like the freedom of cutting all the strips the same width and just place, sew, turn, finger press; place, sew, turn, finger press; etc.


I printed the pattern, then traced it (so it made a mirror image), tracing also the windows and star on the side. (Source - Military train coloring page)


The pieces were placed on cloud fabric that had been enlarged with the blue print used for items on the train and on the reverse side of the pillow in the log cabin design.


I chose a light blue to outline the windows and star on the train itself, and since there was black in the bandanna used for the train, I used a black satin stitch to outline the train. I always use stitching on a piece that is placed with Wonder Under to keep it from fraying and to give it an accent. In this case, I set the zig-zag to a fairly thin width. 


And that's that. It's been a good sewing week!

Thursday, January 9, 2014

Pillows for my daughter's new home

All of my children worked for Busch Gardens in Williamsburg at one time or another when they were teens and older. My daughter, who is moving into a cute little house this weekend, worked in Land of the Dragons, designed for little children. We found a couple sashes from her old uniforms and I put 2 and 2 together and came up with pillows! Who wouldn't, right?

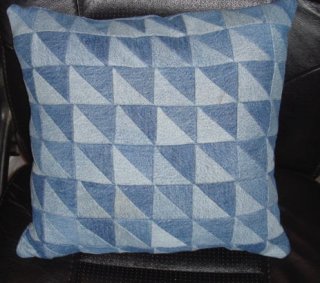
The front include the Land of the Dragons fabric, which I had cut from the sashes, along with some complementary prints that I had on hand. The back is a simple 4" recycled denim 9-patch. She can turn them to the denim side when company comes.


I had fun making these. I haven't made pillows in a while. I still have 2 bags of Poly-fil! I guess I see more pillow making in my future.

Happy Housewarming, Allison and Judge!

Monday, March 11, 2013

Potholder fail lesson becomes making a cute pillow!

New techniques. Always fun to try, but not so much fun to fail!

I saw a lovely hexagon project where the hex was cut into 6 pieces and then strip pieced before being pieced into the final hexagon shape. Hey, I can do that! I rustled up some primary colors from my marbled solids and made bias binding from a rainbow colored fabric. My plan was to make a hot pad, so I cut a hex for the backing and some InsulBright for the batting. And I failed. But I know why - the 1-1/2" strips must not have been cut fussy enough, the seams must not have been consistent enough, and the matching of the strips upon construction of the hexagon was off. Here's the fail:

Yuck! I started to do the binding and then just gave up. The matchy matchy parts that worked are very good, but the ones that don't match so well, they sort of stand out like a sore thumb. 

Here's the better version (you can click these photos for larger pictures):


I decided to go for another try, using a modified log cabin type of piecing. I started with a small hexagon and strip pieced the ROYGBV around it. What I didn't take into consideration was that it would not be a balanced hexagon using that method. This one wasn't such a fail, though, so I got a piece of recycled denim and appliqued the now primary color flower via machine using variegated thread. Before I satin stitched the bottom, I added a piece of the rainbow bias tape I had made and called it a stem. I made some corded piping with the bias tape and added that around the edge, but not before I used the basic flower/snowflake function of my Bernina to add a little something around the edge of the flower. I used non-bias rainbow fabric for the back and stuffed it with PolyFil. It's no hot pad, but it's a cute 8" x 11" pillow.

The bottom line is that I practiced making bias tape and the piping, and used the embroidery feature of my machine, which hasn't been used in forever. I also took what I called a fail out of the trash and made a dog throw out of it.

Even when I screw up a little bit, I'm learning something and I'm sewing. the creative muse gets put to work whether I want it to or not!

Monday, September 5, 2011

Wow! Time has flown, hasn't it?

Let's see - an earthquake and a hurricane, no power for a period of a few days, several sewing projects  being worked on, then on hold, then being worked on, and a busy life in general! That's no excuse for ignoring the blog, now is it? Time for some good karma!

I have a store-bought quilt that is falling apart on the patchwork side, but the back is in great condition. I decided to rescue it and repurpose it and make it a loved member of our winter warming blankie collection. I gave away lots and lots of my stash, but I held onto the browns I have. I cut those all into 8" squares, saving the smaller pieces to make binding. I've been spending time at the machine sewing the squares into strips. It looks like it will be 10 squares by 12 squares to cover the queen quilt top. A true scrap stitching project, I'm using threads that are left over from other projects and garments. I have so many that are gold/brown/off white! After I get the top completely sewn, all the strips combined into one piece, then I will tie the patchwork onto the old quilt, trim up the edges, and bind it anew. I'm very close to finishing the quilt top!

I've also decided to make some clothes for myself. In making this decision (and knowing I'm losing weight), I went through my patterns and have decided to put all the oversized ones on Etsy for sale. As things tend to happen, I found a bunch of 18" doll clothes patterns that I had in duplicate or were collecting dust, not to be used, and am also selling those on Etsy. Soon, I will put together the unlined paisley shirt jacket and the aquamarine top to wear under it, and thus will have a new outfit for flying in October.

Lastly, I have been looking into purchasing more Peter Max fabric for bags and other items to sell. I get so many comments on my Peter Max bag. Every woman should have one!

Happy sewing and look for pictures soon of the browns quilt. It's coming along. Happy Labor Day and enjoy the end of summer. Think good karma!

P.S. Here are a couple pillows I made on contract:

and their backs:

Friday, June 17, 2011

Critters and the things we make

I made some denim pillows for a friend recently. She sent me a picture of her cat enjoying one of the pillows:

This picture reminded me of a picture I took a couple of years ago of my dog on my old couch with a bunch of pillows I had made:
Both animals are in critter heaven. You can't see it well, but the dog has pillows at the back of her body as well, one made from a ham bag and another made from some patchwork of days gone by.

So what if the pillows were made for people. It's fine with me if our furry family members get to enjoy our artsy fartsy ways too, right? Yup, right! Sleep well little munchkins!